
If playing below par and winning is the sign of a top Premier League side, then this Tottenham performance was Championship material. It may have finished Spurs 1 Southampton 0, but this game was far more difficult than the score line suggested.
The Saints did play well to their credit, getting their tactics spot on as we’ll look at in a minute. However, we didn’t do ourselves any favours, leaving it late to attack the weak point in their defence. As we looked at in the Tottenham tactics for Spurs vs Southampton, this was their left back zone and this is where the decisive strike came.
Southampton set up and tactics
Mauricio Pochettino lined his Southampton team up in a 4-2-3-1 to start the game, but this adapted to more of a 4-4-1-1 during the match.
The two constants for the Saints were their relentless pressing and their use of Jack Cork to shut down Gareth Bale in the middle of the park. With Cork lined up alongside Steven Davis, the two condensed any space that was available to the triple award-winning Welshman.
Southampton’s pressing really broke up Spurs’ passing rhythm. We usually complete around 83% of our passes, but here it was way down to 76%, caused by Southampton harrying and being in the passing lanes.

With Cork and Davis closing up space in the middle, Gareth Bale wasn’t really a factor till he was moved out wide. He wasn’t helped by the fact that Clint Dempsey was drifting in to central areas from his position on the left, congesting the play and making it easier for Southampton to cope.
Going forward, the Saints were creating from through balls, especially in the inside right channel. We looked at this in the Tottenham tactics for Spurs vs Southampton and they were attempting to play this way again here.
An early warning was given when Nathaniel Clyne broke in to the Spurs area and fired wide, as Rickie Lambert was a constant creator. The Saints striker, along with Adam Lallana, was looking to provide the ammunition. Lambert played several through balls in this area, whilst Lallana was heavily probing the inside right channel for much of the match.

As a result, Southampton created the better chances in the first half and had several good opportunities after the interval. Lallana scuffing his shot after he’d neatly chipped the ball over an on-rushing Michael Dawson among the best of them.
Spurs play into Saints’ hands
Spurs initial set up really didn’t attack the Saints’ weakness, which has been in their left back area. We looked in the Tottenham tactics at how they’ve been exposed here by several teams this season, including by us at St. Mary’s. In Southampton 1 Spurs 2 we attacked heavily through here early and jumped in to a two-goal lead as was analysed in that match report.
With Southampton scheming for Gareth Bale in the centre, Clint Dempsey was moving inside as we tried to attack down our left. Benoit Assou-Ekotto was overlapping, but we played right in to the heart of Southampton’s defence. As a result our attacks petered out through either the Saints clearing the ball from this area, or several offside passes.

Rarely did the ball move down the right through Aaron Lennon. Our number seven didn’t look 100% fit and prior to his exit on 59 minutes, he only received the ball 13 times. This is where the play should have been going and it wasn’t until the switch to move Gareth Bale out to this side that we started to attack the weaker full back in Luke Shaw.
Bale switch goes at the right side
With Spurs really struggling to create many chances, the switch to move Gareth Bale out to the right side swung the momentum and the game. Southampton had been the superior side up until this point and had created the better chances.
We saw above how we’d been playing predominantly down the left and how Southampton had cleared the ball or we’d played an offside pass. If we look at Spurs’ passing in the final third up until the switch to move Gareth Bale, we can see how under-utilised the right side was.
In the 18 minutes after the switch, Spurs really went much more to this side through Gareth Bale and this is where the game was won.

Prior to the switch, Gareth Bale was moving towards the left side to get involved with much of our play going through this flank. He received the ball 24 times in 72 minutes or once every 3 minutes on average. After the switch, he received the ball 10 times in 18 minutes, a more frequent rate of once every 1.8 minutes. Suddenly Bale was more involved in the game and in the area we should have been attacking, left back Luke Shaw.
The goal, when it came, was a moment to win any match. Now out on the right, Bale was able to escape the attentions of Jack Cork and isolate himself one-on-one with Shaw.
As he drove inside, Lewis Holtby made a clever run to take Cork away, leaving Bale to beat the left back in a foot race to get to the centre.
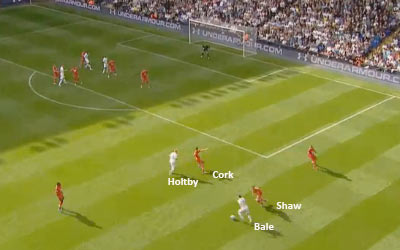
Despite Southampton having a number of defenders in this central area, as they had done all match, Bale was able to fire through the crowd and in to the corner.

The goal was reminiscent of his strike at the Hawthorns in West Brom 0 Spurs 1, where he also drove from the right wing in to the centre to score. In that match he had also lined up in the number ten role before being switched to the flank.
Spurs 1 Southampton 0 conclusions
Spurs really grafted out the victory, which was pleasing to see as Andre Villas-Boas commented that the game was all about getting a win.
“It wasn’t about the performance, it was about getting the result. Sometimes it has to be like that and the three points keeps us in the frame.”
Southampton’s pressing tactics, as well as Jack Cork closing down Gareth Bale, really stifled us until the Welshman was moved out to the flank. This not only created more space and got him away from the attentions of Cork, but also matched him up against Southampton’s weakness in Luke Shaw.
The initial point of attack of going down the left wasn’t working, but the switch of focus to the right for the last 18 minutes won the game and three vital points.
Final score: Spurs 1 Southampton 0.